Chapter 6.4 - The `<map>` Element
Complete HTML reference for the HTML map element, including image maps, area elements, coordinates, accessibility, SEO, browser support, JavaScript integration, and professional implementation.
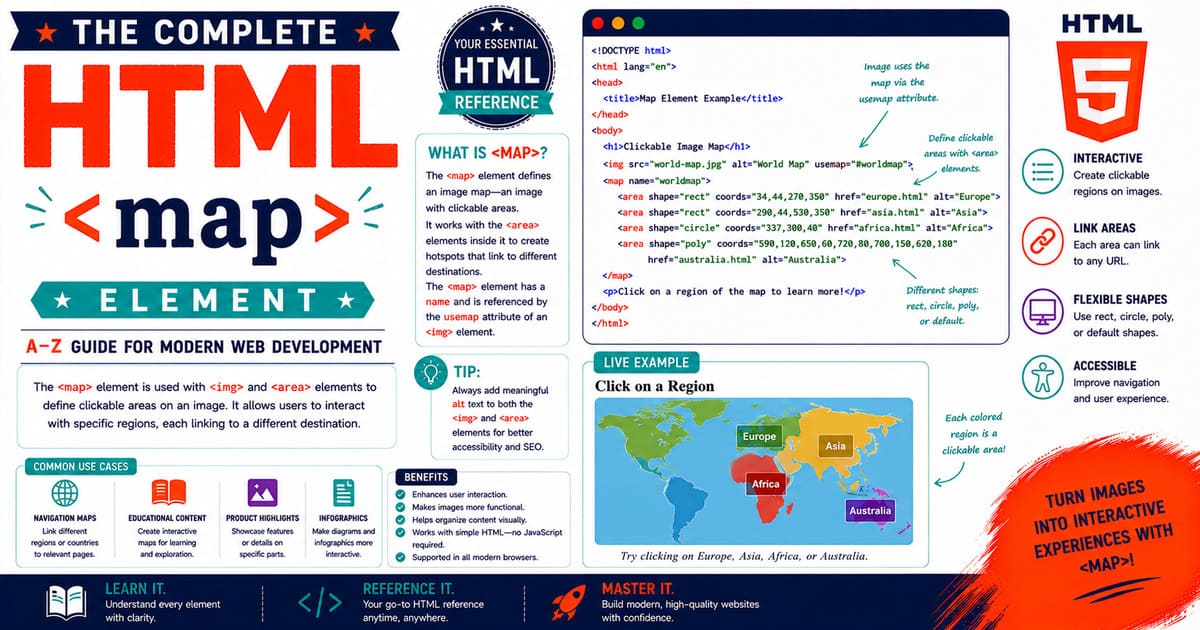
Chapter 6 — Interactive Graphics
6.4 The <map> Element
The <map> element defines an image map, allowing different regions of a single image to function as independent hyperlinks or interactive areas. Instead of making an entire image clickable, an image map lets developers assign different destinations or actions to specific shapes within the image.
Image maps were introduced in the early days of the World Wide Web and remain part of the HTML Living Standard. While they are less common today due to responsive web design and JavaScript frameworks, they continue to be useful for educational diagrams, geographical maps, engineering drawings, product showcases, floor plans, and interactive infographics.
Understanding the <map> element helps developers create interactive visual content without splitting a single image into multiple files.
Why the <map> Element Was Introduced
Before image maps became standardized, developers often divided an image into many smaller images, placing them together inside tables or layouts.
This approach caused several problems:
- Complex page layouts
- Increased HTTP requests
- Difficult maintenance
- Poor scalability
- Accessibility challenges
The <map> element solved these issues by allowing multiple clickable regions to exist within a single image.
HTML Living Standard Definition
According to the HTML Living Standard, the <map> element represents a collection of clickable areas associated with an image.
Each clickable region is defined using one or more <area> elements.
The browser determines whether the user’s pointer falls inside one of these regions and performs the associated action.
Relationship Between <img>, <map>, and <area>
These three elements work together.
1
2
3
4
5
6
7
8
9
10
11
12
13
14
15
16
17
18
19
20
21
22
+----------------------+
|      <img>           |
| usemap="#worldMap"   |
+----------+-----------+
           |
           ▼
+----------------------+
|      <map>           |
| name="worldMap"      |
+----------+-----------+
           |
           ▼
+----------------------+
|      <area>          |
| Clickable Region 1   |
+----------------------+
|      <area>          |
| Clickable Region 2   |
+----------------------+
|      <area>          |
| Clickable Region 3   |
+----------------------+
The <img> element references the map using the usemap attribute.
The <map> element groups multiple clickable regions.
Each <area> element defines one clickable hotspot.
Basic Syntax
Example:
1
2
3
4
5
6
7
8
9
10
11
12
13
14
<img
    src="world-map.jpg"
    alt="World Map"
    usemap="#world">

<map name="world">

    <area
        shape="rect"
        coords="20,40,160,180"
        href="asia.html"
        alt="Asia">

</map>
In this example:
- The image displays normally.
- Only the rectangular region becomes clickable.
- Clicking the rectangle opens
asia.html.
Understanding the usemap Attribute
The usemap attribute connects an image with a <map> element.
Example:
1
2
3
4
<img
    src="continents.jpg"
    usemap="#continents"
    alt="World Continents">
The value begins with a hash (#) followed by the map name.
The corresponding map:
1
2
3
4
5
<map name="continents">

    ...

</map>
The names must match exactly.
The name Attribute
The <map> element requires a name attribute.
Example:
1
2
3
<map name="solarSystem">

</map>
Unlike many HTML elements, the browser identifies image maps using the name attribute rather than an id.
Although an id may also be added for CSS or JavaScript purposes, usemap references the map’s name.
What Is an <area> Element?
The <area> element defines one interactive region inside an image map.
Each area may:
- Open another page
- Download a file
- Trigger JavaScript
- Link to a section of the same page
- Open an email client
- Connect to a telephone number
One image may contain dozens of <area> elements.
Real-World Applications
Image maps are useful for many scenarios.
Examples include:
- World maps
- Country maps
- Human anatomy diagrams
- Computer motherboard layouts
- Vehicle parts diagrams
- Building floor plans
- Museum exhibits
- Product feature demonstrations
- Machine components
- Educational illustrations
Instead of creating multiple images, developers define interactive regions within one image.
Practical Example
Imagine an educational website teaching world geography.
A single world map image can contain clickable continents.
Selecting a continent opens a page containing detailed information.
For example:
- Asia
- Europe
- Africa
- North America
- South America
- Australia
- Antarctica
This creates an intuitive and engaging navigation experience.
Advantages of Image Maps
Using image maps provides several benefits:
- Fewer image files
- Easier maintenance
- Faster page organization
- Interactive learning experiences
- Precise clickable regions
- Standards-based implementation
When used appropriately, image maps remain an effective HTML feature.
Browser Processing
When a browser encounters an image map, it generally performs the following steps:
- Parse the
<img>element. - Read the
usemapattribute. - Locate the matching
<map>element. - Parse every
<area>element. - Calculate each clickable region.
- Monitor pointer interactions.
- Activate the corresponding link or action when a region is selected.
All coordinate calculations occur automatically within the browser.
Browser Compatibility
The <map> element has been supported by browsers for many years.
| Browser | Support |
|---|---|
| Google Chrome | Yes |
| Mozilla Firefox | Yes |
| Microsoft Edge | Yes |
| Apple Safari | Yes |
| Opera | Yes |
Image maps are part of the HTML Living Standard and are widely supported across desktop and mobile browsers.
Pro Tip
Use image maps only when the image naturally represents multiple selectable regions. If a standard navigation menu or list communicates the information more clearly, choose the simpler solution.
Common Mistakes
Mistake 1
Forgetting to add the usemap attribute to the <img> element.
Mistake 2
Using different values for usemap and the map’s name attribute.
Mistake 3
Creating overlapping clickable regions without considering which region should receive pointer events.
Mistake 4
Using image maps for decorative images that do not require interaction.
Accessibility Note
Every <area> element should include a meaningful alt attribute describing its purpose.
Keyboard users and assistive technologies rely on descriptive text to understand the available interactive regions.
Avoid labels such as:
- Area 1
- Region A
- Click Here
Instead, use descriptive alternatives such as:
- Asia
- Product Specifications
- Electrical Control Panel
SEO Note
Search engines primarily analyze page content rather than image coordinates.
To improve discoverability:
- Provide descriptive surrounding text.
- Use meaningful
altattributes. - Add headings explaining the diagram.
- Include related written content.
Image maps should complement informative content rather than replace it.
Summary
In this section, you learned:
- The purpose of the
<map>element. - Why image maps were introduced.
- The relationship between
<img>,<map>, and<area>. - Basic syntax.
- Browser processing.
- Practical applications.
- Accessibility.
- SEO considerations.
Coming Up Next — Section 6.4.2
The next section will explore:
- The
<area>element in detail - Every
<area>attribute shapecoordshreftargetdownloadrelpingreferrerpolicy- Professional implementation examples
6.4.2 The <area> Element and Its Attributes
The <map> element defines a container for interactive regions, but the actual clickable areas are created using the <area> element.
Each <area> represents a hotspot inside an image. When a user clicks or taps a hotspot, the browser performs the associated action, such as opening a webpage, downloading a file, navigating within the current document, or executing a JavaScript action.
A single image map may contain one or hundreds of <area> elements.
Relationship Between <map> and <area>
The <map> element groups multiple <area> elements.
Structure:
1
2
3
4
5
6
7
8
9
<img>
   │
   ▼
<map>
   │
   ├── <area>
   ├── <area>
   ├── <area>
   └── <area>
Each <area> defines:
- A shape
- Coordinates
- A destination
- Optional behavior
- Accessibility information
Basic Syntax
Example:
1
2
3
4
5
6
7
8
9
10
11
12
13
14
<img
    src="world-map.jpg"
    alt="World Map"
    usemap="#world">

<map name="world">

    <area
        shape="rect"
        coords="40,50,220,180"
        href="asia.html"
        alt="Asia">

</map>
The browser associates the rectangle with the destination page.
Complete Attribute Overview
| Attribute | Purpose |
|---|---|
alt | Alternative text |
coords | Coordinates of the clickable region |
download | Downloads the linked resource |
href | Destination URL |
hreflang | Language of the linked resource |
ping | Sends tracking requests after activation |
referrerpolicy | Controls referrer information |
rel | Relationship between documents |
shape | Shape of the hotspot |
target | Specifies where to open the destination |
Some attributes are required for navigation, while others provide additional functionality or security.
The shape Attribute
The shape attribute defines the geometry of the clickable region.
Supported values:
rectcirclepolydefault
Example:
1
2
3
4
5
<area
    shape="rect"
    coords="30,40,180,160"
    href="asia.html"
    alt="Asia">
Each value requires a different coordinate format.
Rectangle (rect)
A rectangle uses four coordinate values.
Format:
1
x1,y1,x2,y2
Example:
1
2
3
4
5
<area
    shape="rect"
    coords="40,60,220,180"
    href="lesson.html"
    alt="Lesson">
Meaning:
- Top-left corner
- Bottom-right corner
This is the most commonly used shape for interface diagrams and screenshots.
Circle (circle)
A circle requires three coordinate values.
Format:
1
centerX,centerY,radius
Example:
1
2
3
4
5
<area
    shape="circle"
    coords="180,140,60"
    href="planet.html"
    alt="Planet">
Meaning:
- Center X coordinate
- Center Y coordinate
- Radius
Circle regions are useful for maps, planets, buttons, and circular objects.
Polygon (poly)
A polygon is defined by multiple coordinate pairs.
Format:
1
x1,y1,x2,y2,x3,y3,...
Example:
1
2
3
4
5
<area
    shape="poly"
    coords="30,40,90,20,180,60,150,150,60,160"
    href="country.html"
    alt="Country">
Polygons allow irregular shapes such as:
- Countries
- Lakes
- Buildings
- Human organs
- Machine components
There is no fixed limit to the number of coordinate pairs.
Default Region (default)
The default shape represents every area not covered by another hotspot.
Example:
1
2
3
4
<area
    shape="default"
    href="home.html"
    alt="Home">
If the user clicks anywhere outside the defined regions, this destination is used.
The coords Attribute
The coords attribute specifies the position of the hotspot.
Example:
1
2
3
4
5
<area
    shape="rect"
    coords="20,40,180,160"
    href="example.html"
    alt="Example">
The coordinate format depends on the selected shape.
Coordinate System
Coordinates begin at the image’s top-left corner.
1
2
3
4
5
6
7
8
9
10
11
12
(0,0)
+----------------------------------------► X

|

|

|

▼

Y
Moving:
- Right increases the X value.
- Down increases the Y value.
Every hotspot is calculated relative to the original image dimensions.
The href Attribute
The href attribute specifies the destination.
Example:
1
2
3
4
5
<area
    shape="circle"
    coords="200,120,40"
    href="earth.html"
    alt="Earth">
Possible destinations include:
- Another webpage
- Downloadable file
- Email address
- Telephone number
- Same-page anchor
- External website
The target Attribute
The target attribute specifies where the destination opens.
Common values:
| Value | Description |
|---|---|
_self | Current browsing context |
_blank | New tab or window |
_parent | Parent browsing context |
_top | Top-level browsing context |
Example:
1
2
3
4
5
6
<area
    shape="rect"
    coords="40,50,200,160"
    href="asia.html"
    target="_blank"
    alt="Asia">
When using _blank, include an appropriate rel value for security.
The rel Attribute
The rel attribute describes the relationship between the current document and the linked resource.
Example:
1
2
3
4
5
6
7
<area
    href="https://example.com"
    target="_blank"
    rel="noopener noreferrer"
    shape="rect"
    coords="20,20,180,160"
    alt="Example">
Using noopener noreferrer helps improve security and privacy.
The download Attribute
The download attribute requests that the linked resource be downloaded instead of opened.
Example:
1
2
3
4
5
6
<area
    shape="rect"
    coords="30,40,220,170"
    href="brochure.pdf"
    download
    alt="Download Brochure">
The browser’s behavior may depend on user settings and server configuration.
The hreflang Attribute
The hreflang attribute indicates the language of the linked resource.
Example:
1
2
3
4
5
6
<area
    href="guide-fr.html"
    hreflang="fr"
    shape="rect"
    coords="20,20,180,160"
    alt="French Guide">
This attribute provides language information but does not automatically translate content.
The ping Attribute
The ping attribute specifies one or more URLs that receive POST requests after the link is activated.
Example:
1
2
3
4
5
6
<area
    href="course.html"
    ping="https://example.com/ping"
    shape="rect"
    coords="30,40,180,160"
    alt="Course">
It is commonly used for analytics and tracking.
Support varies among browsers, and some users disable it for privacy reasons.
The referrerpolicy Attribute
The referrerpolicy attribute controls how much referrer information is sent when the link is followed.
Example:
1
2
3
4
5
6
<area
    href="lesson.html"
    referrerpolicy="no-referrer"
    shape="rect"
    coords="30,40,180,160"
    alt="Lesson">
Common values include:
no-referreroriginstrict-originsame-origin
Choose the policy that best matches your privacy requirements.
The alt Attribute
Every clickable area should include descriptive alternative text.
Example:
1
2
3
4
5
<area
    shape="circle"
    coords="180,120,50"
    href="earth.html"
    alt="Planet Earth">
The alt attribute is essential for accessibility because assistive technologies use it to describe the purpose of each hotspot.
Browser Processing
When the browser processes an <area> element, it:
- Reads the shape.
- Parses the coordinates.
- Calculates the hotspot.
- Waits for pointer or keyboard activation.
- Executes the associated action.
If multiple regions overlap, browser behavior depends on the order of the elements and the specific hotspot selected.
Practical Example
An interactive motherboard diagram might define hotspots for:
- CPU
- RAM
- GPU
- Power connector
- PCI Express slots
- Storage connectors
Each hotspot opens a page explaining that component, allowing users to explore complex hardware visually.
Pro Tip
Use the simplest shape that accurately represents the clickable region. Rectangles are easier to create and maintain than complex polygons.
Common Mistakes
Mistake 1
Using incorrect coordinate values.
Mistake 2
Forgetting the alt attribute.
Mistake 3
Creating overlapping hotspots unintentionally.
Mistake 4
Using _blank without an appropriate rel value.
Mistake 5
Failing to update coordinates after replacing the image with a different size.
Accessibility Note
Each hotspot should have a clear, descriptive alt attribute that communicates its purpose. Users navigating with screen readers should understand exactly where each link leads.
SEO Note
Image maps should support—not replace—well-structured page content. Surround diagrams with explanatory text, headings, and descriptive image alternative text to improve both usability and search visibility.
Summary
In this section, you learned:
- The purpose of the
<area>element. - Every major
<area>attribute. - Rectangle, circle, polygon, and default shapes.
- Coordinate systems.
- Security and privacy attributes.
- Accessibility best practices.
- Professional implementation techniques.
Coming Up Next — Section 6.4.3
The next section explores:
- Coordinate calculation techniques
- Creating accurate hotspots
- Responsive image maps
- Browser scaling behavior
- JavaScript utilities
- Testing and debugging
- Professional workflows
- Real-world implementation examples
6.4.3 Coordinate Systems, Responsive Image Maps, Testing, Debugging, and Professional Workflows
The most challenging aspect of using the <map> and <area> elements is creating accurate hotspot coordinates. While defining links is straightforward, identifying the exact pixel positions for rectangles, circles, and polygons requires careful planning.
This section explains how coordinate systems work, how browsers interpret them, and how to build responsive image maps that continue to function correctly across different screen sizes.
Understanding the Coordinate System
Every image map uses the image’s original (intrinsic) pixel dimensions as its coordinate system.
The origin (0,0) is always located at the top-left corner of the image.
1
2
3
4
5
6
7
8
9
10
11
12
13
14
(0,0)
+----------------------------------------------------► X

|

|

|

|

▼

Y
- Moving to the right increases the X value.
- Moving down increases the Y value.
All hotspot coordinates are measured from this origin.
Image Dimensions
Suppose an image has a size of:
1
2
Width  = 1200 pixels
Height = 800 pixels
The coordinate space becomes:
1
2
3
X : 0 → 1200

Y : 0 → 800
Every hotspot must be positioned within these boundaries.
Rectangle Coordinates
Rectangles require four numbers:
1
x1,y1,x2,y2
Example:
1
120,80,420,260
Meaning:
1
2
3
4
5
6
7
Top-left corner

(120,80)

Bottom-right corner

(420,260)
The browser automatically draws an invisible rectangle between these two points.
Visual Representation
1
2
3
4
5
6
7
8
9
10
11
12
13
Y

80      +----------------------+

        |                      |

        |     Clickable Area   |

260     +----------------------+

       120                  420

              X
This rectangle becomes the active hotspot.
Circle Coordinates
Circle hotspots use three numbers.
Format:
1
centerX,centerY,radius
Example:
1
300,220,70
Meaning:
1
2
3
4
5
6
7
Center

(300,220)

Radius

70 pixels
The browser calculates the circular region automatically.
Polygon Coordinates
Polygon hotspots provide maximum flexibility.
Format:
1
x1,y1,x2,y2,x3,y3,...
Example:
1
2
3
4
5
100,60,
240,40,
310,160,
250,290,
110,260
Each pair represents one vertex of the polygon.
The browser connects every point to create a closed shape.
Polygons are ideal for:
- Country borders
- Buildings
- Rivers
- Human organs
- Machine components
- Product outlines
Choosing the Correct Shape
| Shape | Best Used For |
|---|---|
rect | Buttons, screenshots, interface sections |
circle | Icons, planets, logos, circular objects |
poly | Irregular objects and complex diagrams |
default | Remaining clickable space |
Choose the simplest shape that accurately represents the region.
Finding Coordinates
Several approaches are commonly used.
Method 1 — Graphics Editor
Most developers use image editing software to identify pixel positions.
Typical workflow:
- Open the image.
- Move the pointer over the desired point.
- Read the X and Y coordinates.
- Record the values.
- Repeat for every hotspot.
Method 2 — Browser Developer Tools
Some browser extensions and developer tools allow inspection of image coordinates directly within the browser.
These tools are useful during testing and refinement.
Method 3 — Online Image Map Generators
Various online tools allow developers to:
- Upload an image.
- Draw hotspots visually.
- Export HTML
<map>and<area>code.
These generators are especially helpful for large or complex image maps.
Always review generated code before using it in production.
Responsive Image Maps
Traditional image maps were designed for fixed-size images.
Modern responsive websites introduce an important challenge:
When an image scales, the hotspot coordinates remain based on the original image size.
This can cause clickable areas to become misaligned.
Example Problem
Original image:
1
1200 × 800
Displayed on mobile:
1
600 × 400
The image becomes smaller, but the coordinates remain unchanged.
Without additional handling, hotspots no longer match the visible regions.
Responsive Solution
A responsive image should use CSS similar to the following:
1
2
3
4
img {
    max-width: 100%;
    height: auto;
}
However, responsive CSS alone does not automatically scale image map coordinates.
Additional JavaScript or a responsive image map library is often required to recalculate hotspot positions.
Browser Scaling Behavior
Browsers calculate hotspot coordinates using the image’s intrinsic size.
When CSS scales the image:
- The image changes size.
- Coordinate values remain unchanged.
- Hotspots may no longer align visually.
Understanding this behavior is essential when designing responsive websites.
Testing Image Maps
Always test image maps carefully.
Recommended checklist:
- Desktop browsers
- Tablets
- Mobile phones
- Portrait orientation
- Landscape orientation
- Zoomed pages
- High-resolution displays
- Touch interaction
Verify that every hotspot aligns correctly after resizing.
Debugging Tips
If a hotspot does not work as expected:
- Confirm the
usemapvalue matches the<map>name. - Verify the coordinate values.
- Check image dimensions.
- Ensure the image has fully loaded.
- Confirm that the hotspot does not overlap another region.
- Test with keyboard navigation.
Systematic testing makes troubleshooting much easier.
Browser Performance
Image maps are lightweight.
A typical image map contains:
- One image
- Several
<area>elements - No additional image requests
Performance is generally excellent, even with many hotspots.
Very large polygon maps may require additional testing on low-powered devices.
Practical Example
Imagine a museum website displaying a floor plan.
Each room is represented by a polygon hotspot.
Visitors can click:
- Gallery A
- Gallery B
- Sculpture Hall
- Gift Shop
- Café
- Auditorium
Each region opens detailed information without loading multiple images.
Professional Workflow
A recommended workflow for creating image maps is:
- Design the final image.
- Record its original dimensions.
- Identify hotspot locations.
- Create rectangle, circle, or polygon coordinates.
- Test in multiple browsers.
- Verify keyboard accessibility.
- Optimize the image.
- Publish.
- Test again on responsive layouts.
Following a consistent workflow reduces maintenance issues later.
Pro Tip
Keep the original design file alongside your project. If the image is updated in the future, you can quickly regenerate hotspot coordinates instead of calculating them from scratch.
Common Mistakes
Mistake 1
Changing the image size without updating hotspot coordinates.
Mistake 2
Using unnecessarily complex polygons for simple rectangular regions.
Mistake 3
Not testing touch interactions on mobile devices.
Mistake 4
Assuming responsive CSS automatically scales image map coordinates.
Mistake 5
Replacing an image with a different aspect ratio while keeping the old coordinates.
Accessibility Note
Image maps should never be the only way to navigate important content.
Provide alternative text links or navigation menus so users who cannot interact with the image still have full access to the information.
SEO Note
Search engines rely primarily on surrounding HTML content rather than hotspot coordinates.
Support image maps with:
- Clear headings
- Descriptive paragraphs
- Informative captions
- Relevant internal links
This approach improves usability and search engine understanding.
Summary
In this section, you learned:
- How image map coordinates work.
- Rectangle, circle, and polygon coordinate systems.
- Methods for calculating coordinates.
- Challenges with responsive image maps.
- Browser scaling behavior.
- Testing and debugging techniques.
- Professional development workflows.
Coming Up Next — Section 6.4.4
The next section explores:
- JavaScript integration with image maps
- Dynamic hotspot behavior
- Event handling
- Interactive educational diagrams
- Accessibility improvements
- Performance optimization
- Production-ready implementations
- Browser compatibility
- Security considerations
6.4.4 JavaScript Integration, Dynamic Image Maps, Browser APIs, and Interactive Applications
Although HTML image maps work without JavaScript, modern web applications often combine the <map> and <area> elements with JavaScript to create richer and more interactive experiences.
JavaScript can:
- Detect when a hotspot is selected.
- Display additional information.
- Highlight regions.
- Show tooltips.
- Load content dynamically.
- Record analytics.
- Synchronize image maps with other page components.
Many educational websites, museums, medical applications, engineering tools, and interactive learning platforms use these techniques.
The Document Object Model (DOM)
Every <map> and <area> element becomes part of the Document Object Model (DOM).
This means JavaScript can read and modify these elements while the page is running.
Example HTML:
1
2
3
4
5
6
7
8
9
10
11
12
13
14
15
<img
    src="solar-system.jpg"
    alt="Solar System"
    usemap="#solarSystem">

<map name="solarSystem">

    <area
        id="earth"
        shape="circle"
        coords="250,180,30"
        href="earth.html"
        alt="Earth">

</map>
Because the <area> element has an id, JavaScript can access it directly.
Selecting an <area> Element
Example:
1
const earth = document.getElementById("earth");
The variable now references the corresponding <area> element.
From this point, JavaScript can inspect its attributes or respond to user interactions.
Reading Attributes
Attributes can be read programmatically.
Example:
1
2
3
4
5
6
7
console.log(earth.href);

console.log(earth.alt);

console.log(earth.shape);

console.log(earth.coords);
Possible output:
1
2
3
4
5
6
7
https://example.com/earth.html

Earth

circle

250,180,30
Reading attributes is useful when building interactive educational interfaces or debugging image maps.
Updating Attributes Dynamically
JavaScript can also modify attributes.
Example:
1
earth.alt = "Planet Earth";
Updating the destination:
1
earth.href = "planet-earth.html";
Updating coordinates:
1
earth.coords = "260,180,35";
Changes take effect immediately without reloading the page.
Responding to Click Events
An <area> element supports standard DOM events.
Example:
1
2
3
4
5
earth.addEventListener("click", function () {

    console.log("Earth selected.");

});
This event runs before the browser follows the hyperlink.
Preventing Default Navigation
Sometimes a developer wants to perform another action before navigation.
Example:
1
2
3
4
5
6
7
earth.addEventListener("click", function (event) {

    event.preventDefault();

    alert("Loading information about Earth.");

});
Instead of immediately opening another page, JavaScript performs a custom action.
Displaying Additional Information
Image maps are often used together with an information panel.
Example HTML:
1
<div id="planetInfo"></div>
JavaScript:
1
2
3
4
5
6
7
8
earth.addEventListener("click", function (event) {

    event.preventDefault();

    document.getElementById("planetInfo").textContent =
        "Earth is the third planet from the Sun.";

});
This approach allows users to explore diagrams without leaving the page.
Highlighting Selected Regions
The <area> element itself cannot be styled because it has no visual representation.
Instead, developers typically highlight the underlying image using:
- CSS overlays
- SVG layers
- Canvas drawings
- Absolutely positioned elements
These techniques provide visual feedback while preserving the functionality of the image map.
Tooltips
The title attribute provides a simple browser tooltip.
Example:
1
2
3
4
5
6
<area
    shape="circle"
    coords="250,180,30"
    href="earth.html"
    alt="Earth"
    title="Planet Earth">
When the user hovers over the hotspot, most browsers display the title.
For richer tooltips, JavaScript libraries can be used.
Dynamic Image Maps
Modern applications sometimes generate image maps dynamically.
Example workflow:
- Retrieve region data from a server.
- Create
<area>elements using JavaScript. - Insert them into the
<map>element. - Attach event listeners.
- Update the interface.
This technique is useful for applications where hotspot data changes frequently.
Analytics Integration
Organizations often track which regions users select.
Example:
1
2
3
4
5
earth.addEventListener("click", function () {

    console.log("Earth hotspot selected.");

});
In production, this event might be sent to an analytics platform to measure user engagement.
Interactive Educational Applications
Image maps are particularly useful in education.
Examples include:
- Human anatomy
- Geography
- Astronomy
- Electronics
- Mechanical engineering
- Architecture
- Chemistry diagrams
Selecting a region can reveal:
- Images
- Videos
- Definitions
- Animations
- Quizzes
- Related articles
Browser Processing
When JavaScript is used with image maps, the browser generally performs these steps:
- Parse the HTML.
- Build the DOM.
- Associate the image with the map.
- Create hotspot regions.
- Execute JavaScript.
- Register event listeners.
- Wait for user interaction.
- Trigger events when hotspots are activated.
Performance Considerations
JavaScript interactions with image maps are usually lightweight.
To maintain good performance:
- Minimize unnecessary event listeners.
- Reuse existing DOM elements.
- Avoid repeatedly recalculating coordinates.
- Cache frequently accessed elements.
- Load large datasets only when needed.
These practices improve responsiveness, especially on mobile devices.
Security Considerations
When image maps are generated dynamically:
- Validate all server-side data.
- Sanitize user input.
- Avoid inserting untrusted HTML.
- Use HTTPS for linked resources.
- Apply appropriate Content Security Policy (CSP) settings.
Security is particularly important when hotspot data originates from external sources.
Practical Example
An online biology textbook displays a diagram of the human heart.
Each chamber is represented by a hotspot.
When a student selects a chamber:
- A description appears.
- A short animation begins.
- A pronunciation guide plays.
- A quiz becomes available.
This creates an engaging learning experience without navigating away from the page.
Professional Workflow
A recommended workflow for interactive image maps:
- Design the image.
- Define hotspot coordinates.
- Build the HTML map.
- Test navigation.
- Add JavaScript interactions.
- Verify accessibility.
- Optimize performance.
- Test across browsers.
- Deploy.
- Monitor user feedback.
Pro Tip
Separate your JavaScript logic from HTML markup. Instead of using inline event handlers, attach event listeners in an external JavaScript file. This keeps your code cleaner, easier to maintain, and more reusable.
Common Mistakes
Mistake 1
Using inline JavaScript instead of external scripts.
Mistake 2
Forgetting to prevent default navigation when custom behavior is required.
Mistake 3
Attempting to apply CSS styles directly to <area> elements.
Mistake 4
Creating duplicate id values for hotspots.
Mistake 5
Ignoring keyboard users when adding custom interactions.
Accessibility Note
Interactive behaviors should also be available through keyboard navigation where possible. Additional information shown on click should be accessible to screen readers and should not rely solely on pointer interactions.
SEO Note
JavaScript enhancements should complement the core functionality of the image map. Ensure that important navigation and content remain available even if JavaScript is unavailable or delayed.
Summary
In this section, you learned:
- How JavaScript accesses image maps.
- Reading and modifying
<area>attributes. - Event handling.
- Preventing default navigation.
- Dynamic image maps.
- Analytics integration.
- Educational applications.
- Browser processing.
- Performance optimization.
- Security best practices.
Coming Up Next — Section 6.4.5
The final section of the <map> chapter will cover:
- Production-ready implementations
- Browser compatibility
- Accessibility checklist
- SEO checklist
- Publishing checklist
- Interview questions
- Best practices
- Complete chapter summary
- Professional deployment recommendations
6.4.5 Production-Ready Implementations, Best Practices, Browser Compatibility, Accessibility, SEO, Interview Questions, and Chapter Summary
The <map> element has been part of HTML since the early days of the web. Although it is used less frequently than elements such as <img>, <video>, or <audio>, it remains an excellent solution for creating interactive diagrams and educational content.
Modern websites typically use image maps for specialized purposes where multiple clickable regions naturally exist within a single image.
This final section brings together everything covered in this chapter and demonstrates how to apply image maps in production environments.
Production Example 1 — Interactive World Map
A travel website displays a world map.
Each continent is represented by a separate hotspot.
Visitors can select:
- Asia
- Europe
- Africa
- North America
- South America
- Australia
- Antarctica
Each region links to dedicated travel guides.
Advantages include:
- Simple navigation
- One optimized image
- Easy maintenance
- Intuitive user experience
Production Example 2 — Computer Hardware Guide
A technology website displays a motherboard diagram.
Hotspots identify:
- CPU socket
- RAM slots
- GPU slot
- Power connector
- SATA ports
- NVMe connector
- CMOS battery
Selecting a component opens a detailed explanation.
This approach is particularly useful for educational websites.
Production Example 3 — Medical Learning Platform
A medical training system presents an anatomical illustration.
Students can select:
- Heart
- Lungs
- Liver
- Kidneys
- Brain
- Stomach
Each hotspot displays:
- Medical description
- Illustrations
- Clinical notes
- Related videos
- Practice quizzes
This creates a highly interactive learning environment.
Production Example 4 — Museum Floor Plan
A museum website displays its building layout.
Visitors can click:
- Gallery A
- Gallery B
- Ancient History Wing
- Modern Art Section
- Children’s Area
- Café
- Gift Shop
Each hotspot opens information about exhibits, opening hours, or directions.
Production Example 5 — Product Showcase
An electronics manufacturer displays a product image.
Hotspots identify:
- Camera module
- Display
- Speakers
- USB port
- Buttons
- Sensors
Selecting a hotspot reveals technical specifications without leaving the page.
Recommended Project Structure
A well-organized project makes image maps easier to maintain.
Example:
1
2
3
4
5
6
7
8
9
10
11
12
13
14
15
assets/

├── images/

│   ├── diagrams/

│   ├── maps/

│   └── products/

├── css/

├── js/

└── downloads/
Keeping diagrams, scripts, and styles organized simplifies future updates.
Browser Compatibility
The <map> and <area> elements are supported by all modern browsers.
| Browser | Support |
|---|---|
| Google Chrome | Yes |
| Mozilla Firefox | Yes |
| Microsoft Edge | Yes |
| Apple Safari | Yes |
| Opera | Yes |
Mobile browsers also support image maps, although careful testing is recommended because touch interactions differ from mouse interactions.
Accessibility Checklist
Before publishing an image map, verify the following:
- Every hotspot has meaningful
alttext. - The image includes an appropriate
altattribute. - Important information is available outside the image.
- Keyboard navigation has been tested.
- Links are descriptive.
- Touch targets are large enough for mobile users.
- Visual cues are not the only method of conveying information.
Accessibility should always be considered during the design stage.
SEO Checklist
To improve search engine visibility:
- Use descriptive page titles.
- Write meaningful headings.
- Add explanatory paragraphs before and after the image.
- Include descriptive image alternative text.
- Link related articles.
- Provide additional text describing important regions.
Remember that search engines understand written content much better than image coordinates.
Performance Checklist
Optimize image maps by following these recommendations:
- Compress images appropriately.
- Use modern image formats when practical.
- Avoid excessively large images.
- Minimize unnecessary JavaScript.
- Test on mobile networks.
- Cache static resources.
Although image maps are lightweight, optimized images significantly improve loading performance.
Security Checklist
When image maps link to external resources:
- Use HTTPS.
- Validate dynamically generated URLs.
- Use
rel="noopener noreferrer"withtarget="_blank"where appropriate. - Avoid linking to untrusted resources.
- Apply an appropriate Content Security Policy (CSP).
Security practices should be consistent across the entire website.
Professional Workflow
A recommended production workflow is:
- Design the final image.
- Export the optimized version.
- Determine hotspot coordinates.
- Create the HTML image map.
- Add accessibility attributes.
- Test all hotspots.
- Verify responsive behavior.
- Validate HTML.
- Test on desktop and mobile devices.
- Publish and monitor user feedback.
Following a repeatable workflow reduces maintenance costs and improves quality.
Best Practices
For professional implementations:
- Use descriptive map names.
- Keep hotspot shapes as simple as possible.
- Avoid overlapping regions unless necessary.
- Organize related images and HTML together.
- Test after every image update.
- Maintain consistent naming conventions.
- Provide alternative navigation methods.
These practices make projects easier to maintain over time.
Pro Tip
If users need to identify very small or complex regions, consider combining image maps with zoom functionality or additional labels. This improves usability without sacrificing the simplicity of a single interactive image.
Common Mistakes
Mistake 1
Using image maps for primary website navigation when a standard navigation menu would be more accessible.
Mistake 2
Replacing an image without updating hotspot coordinates.
Mistake 3
Failing to test touch interactions on mobile devices.
Mistake 4
Using vague alternative text such as “Area 1” or “Click Here.”
Mistake 5
Relying solely on image maps without providing text-based alternatives.
Interview Questions
Question 1
What is the purpose of the
<map>element?Answer: It defines an image map that associates one or more clickable regions with a single image.
Question 2
Which HTML element defines individual clickable regions?
Answer: The
<area>element.Question 3
How is an image associated with a
<map>element?Answer: By using the
usemapattribute on the<img>element and matching it to thenameattribute of the<map>element.Question 4
What are the valid values of the
shapeattribute?Answer:
rectcirclepolydefaultQuestion 5
Which attribute specifies the coordinates of a hotspot?
Answer:
coords.Question 6
Can a single image contain multiple clickable regions?
Answer: Yes. A
<map>element can contain multiple<area>elements, each representing a separate hotspot.Question 7
Why are image maps challenging on responsive websites?
Answer: Hotspot coordinates are based on the image’s original dimensions, so resizing the image can cause misalignment unless responsive techniques are applied.
Question 8
Why is the
altattribute important for<area>elements?Answer: It provides descriptive information for assistive technologies and improves accessibility for users who cannot rely on visual interaction.
Chapter Summary
Throughout this chapter, you learned:
- The purpose of the
<map>element. - The role of the
<area>element. - Image map coordinate systems.
- Rectangle, circle, polygon, and default shapes.
- JavaScript integration.
- Responsive design considerations.
- Accessibility best practices.
- SEO recommendations.
- Security considerations.
- Production workflows.
- Browser compatibility.
- Professional implementation techniques.
Image maps remain a valuable HTML feature for educational content, technical documentation, interactive diagrams, and specialized navigation. When combined with accessibility best practices and responsive design techniques, they provide an efficient and standards-compliant method for creating rich visual interactions.
Chapter 6.4 Complete
You have now completed a comprehensive study of the <map> element, including:
- Fundamentals
<area>element- Coordinate systems
- Responsive image maps
- JavaScript integration
- Accessibility
- SEO
- Browser compatibility
- Security
- Production workflows
This knowledge prepares you to design interactive diagrams and educational graphics using standards-compliant HTML.
Coming Up Next — Chapter 6.5: The <area> Element (Standalone Reference)
Although the <area> element has been discussed extensively within the <map> chapter, the next chapter will examine it as a standalone HTML reference, including:
- HTML Living Standard definition
- Complete attribute reference
- DOM interface
- Browser behavior
- JavaScript API
- Accessibility
- SEO
- Security
- Professional implementation examples
- Production best practices
This dedicated reference ensures that every HTML element in this book has its own complete, searchable chapter, even when it is closely related to another element.