Chapter 6.2 - The `<video>` Element
Complete HTML reference for the video element including attributes, browser behavior, accessibility, SEO, performance optimization, JavaScript APIs, and professional implementation.
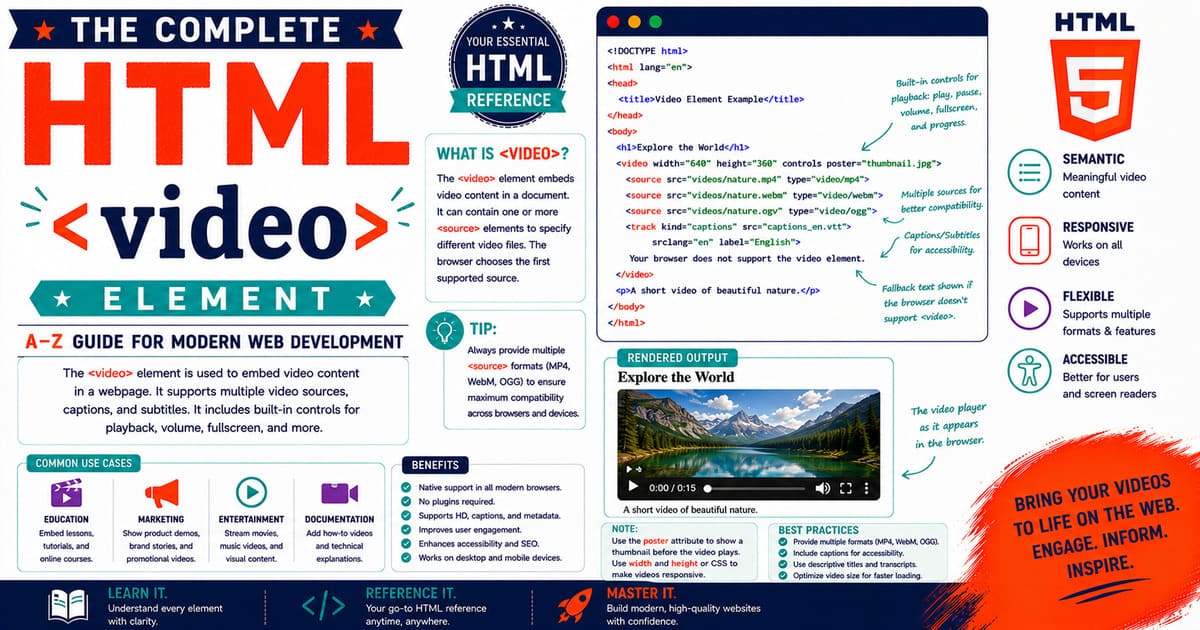
Chapter 6 — Multimedia Elements
6.2 The <video> Element
The <video> element allows web pages to embed and play video content without requiring third-party browser plug-ins. Introduced with HTML5, it replaced technologies such as Adobe Flash for most web video applications and established a standard, interoperable way to deliver multimedia across desktop and mobile browsers.
Today, the <video> element powers a wide range of applications, including:
- Online education
- Product demonstrations
- News websites
- Entertainment platforms
- Corporate presentations
- Marketing pages
- Video portfolios
- Interactive web applications
The browser manages downloading, buffering, decoding, synchronization, and playback, while developers control presentation and behavior through HTML, CSS, and JavaScript.
Why the <video> Element Was Introduced
Before HTML5, websites relied on external technologies to display video.
Common plug-ins included:
- Adobe Flash Player
- Microsoft Silverlight
- Apple QuickTime
- Windows Media Player
These solutions presented several challenges:
- Security vulnerabilities
- Poor mobile support
- Inconsistent browser compatibility
- High resource usage
- Frequent plug-in updates
The HTML5 <video> element solved these issues by making video playback a native browser capability.
HTML Living Standard Definition
According to the HTML Living Standard, the <video> element represents a media player for video playback.
A video may include:
- Visual content
- Audio
- Subtitles
- Captions
- Chapters
- Metadata
The browser determines how to download and present the media while exposing a consistent programming interface.
Quick Facts
| Property | Value |
|---|---|
| Element | <video> |
| HTML Version | HTML5 |
| Category | Embedded Content |
| Content Model | Flow Content, Phrasing Content, Embedded Content |
| Closing Tag | Required |
| DOM Interface | HTMLVideoElement |
Basic Syntax
The simplest implementation is:
1
2
3
4
5
<video controls>

    <source src="lesson.mp4" type="video/mp4">

</video>
The browser displays built-in playback controls.
Anatomy of a Video Element
Example:
1
2
3
4
5
6
7
8
9
10
<video
controls
width="800"
height="450">

    <source src="lesson.mp4" type="video/mp4">

    Your browser does not support HTML video.

</video>
This example contains:
- The
<video>container - Playback controls
- Width and height
- A
<source>element - Fallback content
Understanding the <source> Element
The <source> element allows developers to provide multiple video formats.
Example:
1
2
3
4
5
6
7
<video controls>

    <source src="lesson.webm" type="video/webm">

    <source src="lesson.mp4" type="video/mp4">

</video>
The browser evaluates each source and selects the first compatible format.
Why Multiple Sources Matter
Different browsers support different video codecs.
Providing multiple formats increases compatibility across browsers and operating systems.
Typical combinations include:
- WebM + MP4
- AV1 + MP4
- WebM + MP4 + Ogg (legacy support)
Common Video Formats
| Format | MIME Type | Notes |
|---|---|---|
| MP4 | video/mp4 | Widely supported |
| WebM | video/webm | Open format |
| Ogg | video/ogg | Legacy open format |
| AV1 | video/mp4 or video/webm (container dependent) | High efficiency |
The actual codec inside the container is equally important.
Browser Video Selection
When multiple sources exist, the browser generally:
- Reads the first
<source>. - Checks MIME type and codec support.
- Selects the first playable resource.
- Ignores remaining sources.
Only one video file is downloaded.
Video Dimensions
Videos can define their display size.
Example:
1
2
3
4
5
6
7
8
<video
controls
width="1280"
height="720">

    <source src="tutorial.mp4" type="video/mp4">

</video>
Specifying dimensions helps browsers reserve layout space and reduces cumulative layout shift (CLS).
Fallback Content
Fallback content appears only when the browser cannot play HTML5 video.
Example:
1
2
3
4
5
6
7
<video controls>

    <source src="lesson.mp4" type="video/mp4">

    Your browser does not support HTML5 video.

</video>
Although rarely needed today, fallback text remains a good practice.
Real-World Applications
Professional websites use the <video> element for:
- Online courses
- Product walkthroughs
- News reports
- Interviews
- Company introductions
- Event recordings
- Demonstrations
- Tutorials
Accessibility Note
Video should not be the only source of important information.
Whenever possible, provide:
- Captions
- Subtitles
- Transcripts
- Audio descriptions (when appropriate)
These additions improve accessibility and user experience.
SEO Note
Search engines cannot fully understand video content.
Improve discoverability by including:
- Descriptive titles
- Transcripts
- Structured headings
- Relevant surrounding text
- Video metadata
Pro Tip
Store videos in modern compressed formats and optimize them before publishing. Large, uncompressed videos significantly affect page performance and user experience.
Common Mistakes
Mistake 1
Uploading extremely large video files without compression.
Mistake 2
Providing only one uncommon video format.
Mistake 3
Ignoring captions for educational content.
Mistake 4
Embedding videos larger than the available layout.
Summary
In this section, you learned:
- The purpose of the
<video>element. - HTML Living Standard definition.
- Browser support.
- Video formats.
<source>integration.- Browser selection process.
- Accessibility basics.
- SEO considerations.
Coming Up Next — Section 6.2.2
The next section covers:
- Complete
<video>attribute reference controlsautoplayloopmutedplaysinlineposterpreloadcrossorigin- Browser behavior
- Best practices
6.2.3 The HTMLVideoElement Interface, JavaScript Control, Media Events, Fullscreen API, Picture-in-Picture, and Dynamic Playback
While HTML defines the structure of a video player, JavaScript provides complete control over how videos behave. Through the HTMLVideoElement interface, developers can start playback, pause videos, seek to specific positions, adjust playback speed, enter fullscreen mode, and respond to media events.
The HTMLVideoElement interface extends the HTMLMediaElement interface, meaning it shares many properties and methods with the <audio> element while adding video-specific capabilities.
Inheritance hierarchy:
- EventTarget
- Node
- Element
- HTMLElement
- HTMLMediaElement
- HTMLVideoElement
Selecting a Video Element
To control a video using JavaScript, first obtain a reference to the element.
HTML:
1
2
3
<video id="tutorialVideo" controls>
    <source src="lesson.mp4" type="video/mp4">
</video>
JavaScript:
1
const video = document.getElementById("tutorialVideo");
The video variable now references the HTMLVideoElement.
Playing a Video
Playback can be started programmatically.
1
video.play();
The play() method returns a Promise.
Example:
1
2
3
4
5
6
7
video.play()
    .then(() => {
        console.log("Playback started.");
    })
    .catch(error => {
        console.log("Playback blocked:", error);
    });
Modern browsers may reject the Promise if autoplay restrictions prevent playback.
Pausing a Video
Playback can be paused.
1
video.pause();
The current playback position is preserved.
Restarting Playback
To restart from the beginning:
1
2
video.currentTime = 0;
video.play();
Stopping a Video
There is no dedicated stop() method.
Developers typically stop playback by combining:
1
2
video.pause();
video.currentTime = 0;
Seeking to a Specific Position
The currentTime property represents the current playback position in seconds.
Example:
1
video.currentTime = 120;
This jumps to two minutes into the video.
Reading the Current Position
1
console.log(video.currentTime);
Useful for:
- Progress indicators
- Resume playback
- Bookmarking lessons
Determining Video Duration
The duration property returns the total playback length.
1
console.log(video.duration);
The value is expressed in seconds.
Adjusting Playback Speed
The playbackRate property changes playback speed.
1
video.playbackRate = 1.5;
Common values:
| Value | Speed |
|---|---|
| 0.5 | Half speed |
| 1 | Normal |
| 1.25 | Slightly faster |
| 1.5 | Fast |
| 2 | Double speed |
Educational websites often allow learners to adjust playback speed.
Adjusting Volume
Volume ranges from 0 to 1.
1
video.volume = 0.75;
This sets playback to approximately 75% volume.
Muting and Unmuting
Mute:
1
video.muted = true;
Restore sound:
1
video.muted = false;
Looping with JavaScript
Instead of using the HTML attribute:
1
<video loop>
Looping can be enabled dynamically.
1
video.loop = true;
Common Video Events
The browser generates events throughout playback.
| Event | Description |
|---|---|
play | Playback begins |
pause | Playback pauses |
ended | Playback completes |
timeupdate | Playback position changes |
loadedmetadata | Metadata becomes available |
canplay | Enough data is available to begin playback |
canplaythrough | Browser estimates uninterrupted playback |
waiting | Playback is waiting for more data |
error | Media error occurred |
Listening for Events
Example:
1
2
3
video.addEventListener("play", () => {
    console.log("Video started.");
});
Pause event:
1
2
3
video.addEventListener("pause", () => {
    console.log("Video paused.");
});
Completion event:
1
2
3
video.addEventListener("ended", () => {
    console.log("Video finished.");
});
Tracking Playback Progress
The timeupdate event is useful for custom progress bars.
1
2
3
video.addEventListener("timeupdate", () => {
    console.log(video.currentTime);
});
Waiting for Metadata
Metadata should be loaded before reading duration or dimensions.
1
2
3
video.addEventListener("loadedmetadata", () => {
    console.log(video.duration);
});
Handling Errors
Applications should respond gracefully when playback fails.
1
2
3
video.addEventListener("error", () => {
    console.log("Unable to load the video.");
});
Entering Fullscreen Mode
Many browsers support fullscreen playback through the Fullscreen API.
Example:
1
video.requestFullscreen();
Some browsers may require user interaction before entering fullscreen mode.
Exiting Fullscreen
1
document.exitFullscreen();
Developers can also monitor fullscreen changes using the fullscreenchange event.
Picture-in-Picture
Some browsers support Picture-in-Picture (PiP), allowing users to watch a floating video window while interacting with other applications.
Example:
1
video.requestPictureInPicture();
Availability depends on browser support and user permissions.
Creating a Video with JavaScript
Developers can create video elements dynamically.
1
2
3
4
5
6
7
const video = document.createElement("video");

video.src = "lesson.mp4";

video.controls = true;

document.body.appendChild(video);
This approach is useful for single-page applications and dynamically generated content.
Professional Example
1
2
3
4
5
6
7
8
9
10
11
const lesson = document.getElementById("tutorialVideo");

lesson.volume = 0.8;

lesson.playbackRate = 1.25;

lesson.play();

lesson.addEventListener("ended", () => {
    alert("Lesson completed.");
});
This example combines several frequently used APIs.
Browser Compatibility
The HTMLVideoElement interface is fully supported in modern browsers.
| Browser | Support |
|---|---|
| Google Chrome | Yes |
| Mozilla Firefox | Yes |
| Microsoft Edge | Yes |
| Apple Safari | Yes |
| Opera | Yes |
Some advanced features, such as Picture-in-Picture, vary by browser.
Pro Tip
When building custom video players, always retain keyboard accessibility and provide visible controls for play, pause, seeking, and volume adjustment.
Common Mistakes
Mistake 1
Calling play() before user interaction.
Mistake 2
Reading metadata before the loadedmetadata event.
Mistake 3
Ignoring Promise rejections returned by play().
Mistake 4
Assuming every browser supports Picture-in-Picture.
Mistake 5
Creating custom controls without keyboard support.
Accessibility Note
If custom controls replace the browser’s built-in controls:
- Ensure all controls are keyboard accessible.
- Provide clear labels.
- Maintain visible focus indicators.
- Test with screen readers.
- Avoid relying solely on icons.
SEO Note
JavaScript-controlled playback does not directly improve search rankings.
Provide:
- Descriptive page content.
- Video transcripts.
- Meaningful headings.
- Structured data where appropriate.
Summary
In this section, you learned:
- The
HTMLVideoElementinterface. - JavaScript playback control.
- Media events.
- Playback speed control.
- Fullscreen mode.
- Picture-in-Picture.
- Dynamic video creation.
- Professional implementation techniques.
Coming Up Next — Section 6.2.4
The next section will explore:
- Browser video rendering pipeline
- Video buffering
- Network requests
- Streaming technologies
- Adaptive bitrate streaming
- Browser caching
- Security considerations
- Performance optimization
- Jekyll integration
6.2.4 Browser Video Rendering Pipeline, Buffering, Streaming, Network Requests, Caching, Security, Performance, and Jekyll Integration
A browser performs much more work than simply displaying a video. Behind every successful playback is a sophisticated multimedia pipeline responsible for downloading, decoding, buffering, synchronizing, and rendering both video and audio.
Understanding this process enables developers to optimize performance, troubleshoot playback issues, and build professional multimedia applications.
Browser Video Processing Pipeline
The browser follows a sequence of operations before video appears on the screen.
1
2
3
4
5
6
7
8
9
10
11
12
13
14
15
16
17
18
19
20
21
22
23
24
25
26
27
28
29
30
31
32
33
34
35
36
37
HTML Parser
      │
      ▼
Create <video> Element
      │
      ▼
Read Attributes
      │
      ▼
Evaluate <source> Elements
      │
      ▼
Choose Supported Format
      │
      ▼
Check Browser Cache
      │
      ▼
Send Network Request
      │
      ▼
Receive Video Data
      │
      ▼
Decode Video & Audio
      │
      ▼
Buffer Frames
      │
      ▼
Render Video
      │
      ▼
Synchronize Audio
      │
      ▼
Display to User
Every stage contributes to smooth and reliable playback.
Step 1 — HTML Parsing
The browser parses the HTML document.
Example:
1
2
3
4
5
<video controls>

    <source src="lesson.mp4" type="video/mp4">

</video>
A HTMLVideoElement object is created inside the Document Object Model (DOM).
Step 2 — Reading Attributes
The browser processes attributes such as:
- controls
- autoplay
- muted
- loop
- poster
- preload
- playsinline
These attributes influence later stages of playback.
Step 3 — Selecting a Video Source
If multiple <source> elements exist, the browser evaluates each one.
Example:
1
2
3
4
5
6
7
<video controls>

    <source src="lesson.webm" type="video/webm">

    <source src="lesson.mp4" type="video/mp4">

</video>
The browser selects the first playable source based on supported container formats and codecs.
Step 4 — Browser Cache
Before requesting the video from the server, the browser checks its local cache.
If a valid cached copy exists:
- No download is required.
- Playback starts more quickly.
- Network traffic is reduced.
Proper cache configuration significantly improves website performance.
Step 5 — Network Request
When the video is not cached, the browser sends an HTTP or HTTPS request.
The request includes:
- Resource URL
- Request headers
- Cache validation
- Compression preferences
- Referrer information
The web server responds with the requested video data.
Step 6 — Container Parsing
A video file consists of a container format and one or more encoded streams.
Example:
1
2
3
4
5
6
7
MP4 Container

├── Video Stream (H.264)

├── Audio Stream (AAC)

└── Metadata
The browser separates these components before decoding begins.
Step 7 — Video Decoding
Compressed video frames are decoded into raw image frames.
Modern browsers use hardware acceleration whenever possible.
Common video codecs include:
- H.264 (AVC)
- H.265 (HEVC)
- VP9
- AV1
Hardware decoding reduces CPU usage and improves battery life on mobile devices.
Step 8 — Audio Decoding
If the video contains audio, the audio stream is decoded separately.
Common audio codecs include:
- AAC
- Opus
- MP3
- Vorbis
The browser later synchronizes the decoded audio with the video frames.
Step 9 — Buffering
Downloaded data is temporarily stored in memory before playback.
Benefits of buffering include:
- Smooth playback
- Reduced interruptions
- Better handling of slow network connections
Without adequate buffering, playback may pause while additional data is downloaded.
Step 10 — Rendering Frames
Decoded video frames are rendered by the browser’s graphics engine.
Rendering involves:
- Scaling
- Color conversion
- Applying CSS transformations
- Compositing
- Displaying frames at the correct refresh rate
Step 11 — Audio and Video Synchronization
One of the browser’s most important responsibilities is keeping audio and video synchronized.
For example:
- Lip movements should match speech.
- Background music should align with visuals.
- Animations should remain synchronized with narration.
The browser continuously adjusts playback timing to maintain synchronization.
Streaming Video
Modern websites often stream video instead of downloading the complete file.
Streaming process:
1
2
3
4
5
6
7
8
9
10
11
12
13
14
15
16
Request Initial Segment
        │
        ▼
Download Small Portion
        │
        ▼
Decode
        │
        ▼
Buffer
        │
        ▼
Display
        │
        ▼
Continue Downloading Remaining Segments
Users can begin watching before the entire video has downloaded.
Adaptive Bitrate Streaming
Large streaming platforms rarely deliver a single video file.
Instead, they use Adaptive Bitrate Streaming (ABR).
The server stores multiple versions of the same video:
- 240p
- 360p
- 480p
- 720p
- 1080p
- 4K
The browser automatically switches between versions based on:
- Internet speed
- Device performance
- Buffer health
Popular adaptive streaming technologies include:
- HLS (HTTP Live Streaming)
- MPEG-DASH
Although these technologies work with the <video> element, they require additional server-side support.
Browser Memory Management
Video playback consumes considerably more memory than audio.
Browsers automatically:
- Release unused frames.
- Discard old buffers.
- Free decoder resources.
- Manage GPU memory.
Developers should avoid leaving unused video elements in the DOM.
Security Considerations
Professional websites should:
- Serve video over HTTPS.
- Host media on trusted servers.
- Configure CORS correctly.
- Protect premium content when necessary.
- Validate uploaded media.
Remember that embedding copyrighted videos without permission may violate copyright law.
Performance Optimization
Compress Videos
Choose modern codecs such as:
- H.264
- VP9
- AV1
These provide excellent quality while reducing file size.
Optimize Resolution
Avoid uploading unnecessarily large videos.
For example:
- 720p is often sufficient for tutorials.
- 1080p suits most educational content.
- 4K should be reserved for situations where additional detail is necessary.
Choose an Appropriate preload Value
For most educational websites:
1
<video preload="metadata">
provides a good balance between performance and usability.
Use Poster Images
A poster image provides a visual preview before playback begins.
Benefits include:
- Improved perceived performance.
- Better user engagement.
- Reduced blank areas during loading.
Enable Browser Caching
Static video files should be cached when possible.
Caching reduces:
- Server load
- Network usage
- Repeat downloads
Accessibility Best Practices
For every instructional or informational video:
- Provide captions.
- Include subtitles where appropriate.
- Offer a transcript.
- Ensure playback controls are keyboard accessible.
- Avoid autoplay with sound.
These practices improve usability for all visitors.
Jekyll Integration
A well-organized project structure makes media management easier.
Recommended directory structure:
1
2
3
4
5
6
7
8
9
10
11
assets/

└── videos/

    ├── tutorials/

    ├── courses/

    ├── interviews/

    └── demonstrations/
Example HTML within a Markdown post:
1
2
3
4
5
6
7
8
9
10
11
12
13
14
<video
controls
poster="/assets/images/html-video-poster.jpg"
preload="metadata"
width="1280"
height="720">

    <source
        src="/assets/videos/tutorials/html-introduction.mp4"
        type="video/mp4">

    Your browser does not support HTML5 video.

</video>
This organization scales well as the website grows.
Pro Tip
For educational websites, combine videos with:
- Written explanations
- Downloadable notes
- Source code
- Diagrams
- Quizzes
This creates a richer learning experience and improves accessibility and SEO.
Common Mistakes
Mistake 1
Uploading uncompressed videos.
Mistake 2
Ignoring browser caching.
Mistake 3
Using autoplay with sound.
Mistake 4
Providing no captions.
Mistake 5
Hosting extremely large videos on low-performance servers.
Accessibility Note
Video content should always have a text alternative.
Captions and transcripts not only improve accessibility but also benefit users in quiet environments or those learning a new language.
SEO Note
Search engines rely heavily on surrounding textual content.
To improve visibility:
- Write descriptive titles.
- Add transcripts.
- Include meaningful headings.
- Organize multimedia logically.
- Use structured data where appropriate.
Summary
In this section, you learned:
- Browser video rendering pipeline.
- Container parsing.
- Video and audio decoding.
- Buffering.
- Streaming concepts.
- Adaptive bitrate streaming.
- Browser caching.
- Security considerations.
- Performance optimization.
- Accessibility.
- Jekyll integration.
Coming Up Next — Section 6.2.5
The final section of the <video> chapter will cover:
- Production-ready video examples.
- Custom video players.
- Complete attribute reference.
- Browser compatibility.
- Interview questions.
- Publishing checklist.
- Professional workflows.
- Final chapter summary.
6.2.5 Production Examples, Responsive Video, Browser Compatibility, Publishing Checklist, Interview Questions, and Chapter Summary
The <video> element has become the standard solution for delivering multimedia on the modern web. From online education and digital marketing to streaming services and corporate training, HTML5 video provides a secure, efficient, and accessible method for publishing video content.
This section demonstrates production-ready implementations and summarizes the best practices discussed throughout this chapter.
Production Example 1 — Educational Website
Educational platforms commonly use the following structure.
1
2
3
4
5
6
7
8
9
10
11
12
13
14
<video
    controls
    poster="/assets/images/html-course-cover.jpg"
    preload="metadata"
    width="1280"
    height="720">

    <source
        src="/assets/videos/tutorials/html-introduction.mp4"
        type="video/mp4">

    Your browser does not support HTML5 video.

</video>
Advantages include:
- Native browser controls
- Fast page loading
- Responsive layout
- Excellent browser compatibility
Production Example 2 — Product Demonstration
Product pages frequently include demonstration videos.
1
2
3
4
5
6
7
8
9
<video
    controls
    poster="/assets/images/product-demo.jpg">

    <source
        src="/assets/videos/product-demo.mp4"
        type="video/mp4">

</video>
These videos help customers understand products before making purchasing decisions.
Production Example 3 — Corporate Training
Corporate learning systems often include instructional videos together with downloadable resources.
Typical page layout:
- Video lesson
- Lesson summary
- Downloadable PDF
- Source code
- Practice exercise
- Quiz
This combination improves learning outcomes and user engagement.
Responsive Video
Modern websites should ensure videos adapt to different screen sizes.
Example CSS:
1
2
3
4
5
6
7
8
9
.video-container {
    max-width: 100%;
}

.video-container video {
    width: 100%;
    height: auto;
    display: block;
}
Example HTML:
1
2
3
4
5
6
7
8
9
<div class="video-container">

    <video controls>

        <source src="lesson.mp4" type="video/mp4">

    </video>

</div>
This approach allows videos to scale naturally across desktops, tablets, and mobile devices.
Poster Image Recommendations
Choose poster images that:
- Match the video’s aspect ratio.
- Clearly represent the content.
- Load quickly.
- Maintain high visual quality.
- Avoid excessive text.
A good poster image encourages users to begin playback.
Organizing Video Assets
Large websites should store video files in a logical directory structure.
Example:
1
2
3
4
5
6
7
8
9
10
11
12
13
14
15
assets/

├── videos/

│   ├── html/

│   ├── css/

│   ├── javascript/

│   └── tutorials/

├── images/

└── captions/
A consistent structure simplifies maintenance as projects grow.
Publishing Workflow
A professional publishing process typically includes:
- Record the video.
- Edit and remove unnecessary sections.
- Normalize audio levels.
- Export using an efficient codec.
- Generate a poster image.
- Create captions.
- Write a transcript.
- Compress the final file.
- Test playback in multiple browsers.
- Publish and validate the HTML.
Browser Compatibility
The <video> element is supported by all modern browsers.
| Browser | Support |
|---|---|
| Google Chrome | Yes |
| Mozilla Firefox | Yes |
| Microsoft Edge | Yes |
| Apple Safari | Yes |
| Opera | Yes |
Support for advanced features such as Picture-in-Picture, hardware decoding, and specific codecs may vary by browser and operating system.
Accessibility Checklist
Before publishing a video, verify the following:
- Playback controls are available.
- Controls are keyboard accessible.
- Captions are provided.
- Transcripts are available.
- Poster images include meaningful context.
- Videos do not autoplay with sound.
- Important information is also available as text.
SEO Checklist
To improve discoverability:
- Use descriptive page titles.
- Write meaningful headings.
- Include complete transcripts.
- Add descriptive surrounding text.
- Optimize poster images.
- Use structured metadata when appropriate.
- Keep video filenames descriptive.
Performance Checklist
For optimal performance:
- Compress video files.
- Use modern codecs.
- Specify width and height.
- Enable browser caching.
- Use
preload="metadata"unless another option is justified. - Optimize poster images.
- Avoid embedding unnecessary large videos on a single page.
Common Mistakes
Mistake 1
Publishing videos without captions.
Mistake 2
Uploading uncompressed source files.
Mistake 3
Ignoring responsive layouts.
Mistake 4
Providing no fallback text.
Mistake 5
Using autoplay for instructional videos.
Interview Questions
Question 1
Which HTML element embeds video content?
Answer:
<video>Question 2
Which DOM interface represents the
<video>element?Answer:
HTMLVideoElementQuestion 3
Why is the
<source>element commonly used inside<video>?Answer: It allows developers to provide multiple video formats so the browser can select one it supports.
Question 4
What is the purpose of the
posterattribute?Answer: It displays a preview image before playback begins.
Question 5
What does
playsinlinedo?Answer: It requests that supported mobile browsers play the video within the webpage instead of automatically entering fullscreen mode.
Question 6
Why are captions important?
Answer: Captions improve accessibility, help users in sound-sensitive environments, and can support language learners.
Question 7
Why should developers specify
widthandheight?Answer: They help browsers reserve layout space before the video loads, reducing layout shifts.
Chapter Summary
Throughout this chapter, you learned:
- The purpose of the
<video>element. - HTML Living Standard concepts.
- Browser-supported video formats.
- Complete attribute reference.
- JavaScript control using
HTMLVideoElement. - Media events.
- Fullscreen mode.
- Picture-in-Picture.
- Browser rendering pipeline.
- Streaming concepts.
- Performance optimization.
- Accessibility.
- SEO.
- Responsive implementation.
- Professional publishing workflows.
The <video> element is one of the most powerful multimedia components in HTML. When implemented correctly, it provides a fast, accessible, standards-based solution for delivering rich visual content across virtually every modern browser and device.
End of Chapter 6.2 — The <video> Element
Status: Complete
Coming Up Next
Chapter 6.3 — The <track> Element
The next chapter explores:
- Text tracks
- Subtitles
- Captions
- Descriptions
- Chapters
- Metadata tracks
- WebVTT format
- Accessibility
- Browser support
- JavaScript integration
- Professional implementation