Chapter 6 — 6.1 The `<audio>` Element
A complete HTML reference for the audio element, including attributes, browser behavior, accessibility, SEO, JavaScript APIs, performance optimization, and professional implementation.
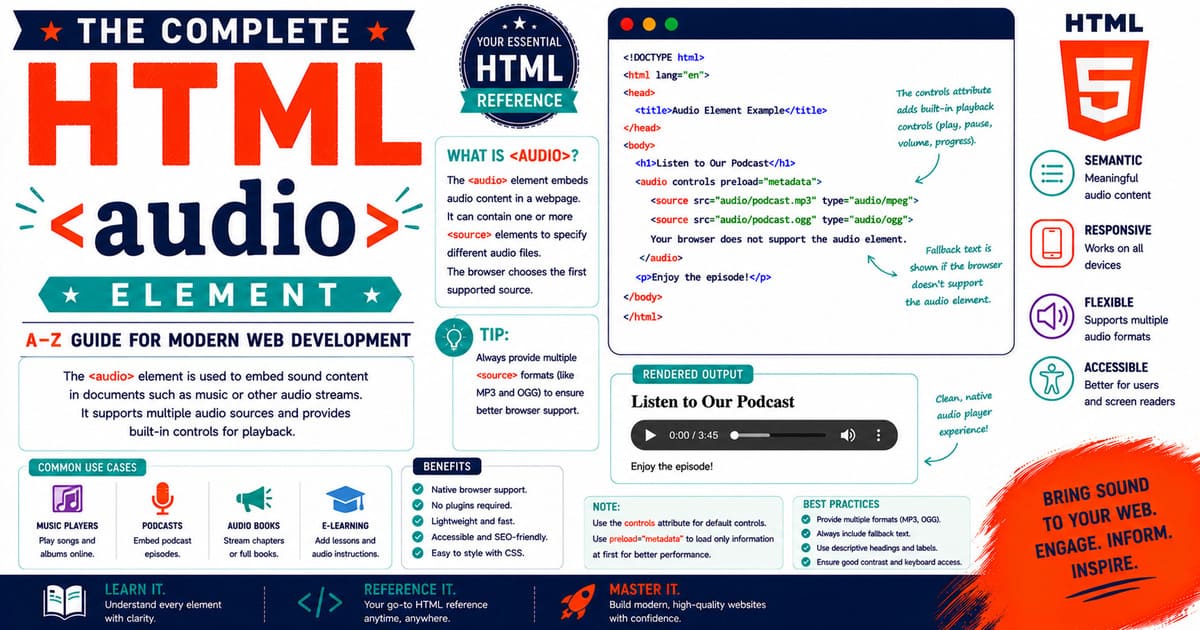
Chapter 6 — Multimedia Elements
6.1 The <audio> Element
The <audio> element is used to embed sound content into an HTML document.
Introduced as part of HTML5, it eliminated the need for browser plug-ins such as Adobe Flash, QuickTime, Windows Media Player, and Silverlight for playing audio on web pages.
Today, the <audio> element is supported by all modern browsers and is widely used for:
- Music streaming
- Podcasts
- Audiobooks
- Online courses
- Sound effects
- Language learning
- Notifications
- Accessibility enhancements
Unlike earlier web technologies, HTML audio is integrated directly into the browser and controlled through standard HTML, CSS, and JavaScript.
Quick Facts
| Property | Value |
|---|---|
| Element | <audio> |
| HTML Version | HTML5 |
| Category | Embedded Content |
| Content Model | Flow Content, Phrasing Content, Embedded Content |
| Closing Tag | Required |
| DOM Interface | HTMLAudioElement |
| Typical Parent | Any flow container |
Basic Syntax
The simplest audio player is:
1
2
3
4
5
<audio controls>

    <source src="music.mp3" type="audio/mpeg">

</audio>
The browser displays built-in playback controls.
If the browser supports the supplied format, playback begins when the user presses the play button.
Why Was the <audio> Element Introduced?
Before HTML5, developers depended on external browser plug-ins.
Common plug-ins included:
- Adobe Flash
- Windows Media Player
- Apple QuickTime
- RealPlayer
These solutions suffered from:
- Security problems
- Compatibility issues
- Mobile limitations
- Frequent updates
- Poor accessibility
HTML5 solved these problems by introducing native multimedia support.
HTML Living Standard Definition
According to the HTML Living Standard, the <audio> element represents sound content.
The browser manages:
- Downloading
- Buffering
- Decoding
- Playback
- Volume
- Seeking
- Timing
without requiring external software.
Content Categories
The <audio> element belongs to multiple HTML content categories.
| Category | Included |
|---|---|
| Flow Content | Yes |
| Phrasing Content | Yes |
| Embedded Content | Yes |
| Interactive Content | When controls are enabled |
Required and Optional Tags
Unlike <img> and <source>, the <audio> element is not a void element.
Opening tag:
1
<audio>
Closing tag:
1
</audio>
Both are required.
Anatomy of an Audio Element
A complete example:
1
2
3
4
5
6
7
8
9
10
11
<audio
controls
preload="metadata">

<source
src="podcast.mp3"
type="audio/mpeg">

Your browser does not support HTML audio.

</audio>
Each part serves a specific purpose.
Understanding the <source> Element
The <source> element supplies one or more audio files.
Example:
1
2
3
4
5
6
7
8
9
10
11
<audio controls>

<source
src="lesson.mp3"
type="audio/mpeg">

<source
src="lesson.ogg"
type="audio/ogg">

</audio>
The browser evaluates each source until it finds one it can play.
Why Multiple Sources Matter
Different browsers support different codecs.
Providing multiple formats increases compatibility.
Typical order:
- Ogg
- MP3
or
- Opus
- Ogg
- MP3
depending on project requirements.
Audio Formats
Common audio formats include:
| Format | MIME Type | Notes |
|---|---|---|
| MP3 | audio/mpeg | Widely supported |
| Ogg Vorbis | audio/ogg | Open format |
| WAV | audio/wav | Large, uncompressed |
| AAC | audio/aac | Efficient compression |
| Opus | audio/opus | Modern, high quality |
Each format offers different trade-offs between quality, compression, and browser support.
Browser Audio Selection
When multiple sources exist, browsers follow a simple process:
- Read the first
<source>. - Check MIME type support.
- Verify codec compatibility.
- Load the first supported resource.
- Ignore remaining sources.
Only one file is downloaded for playback.
Browser Fallback Content
Anything placed between the opening and closing <audio> tags is displayed only if audio playback is not supported.
Example:
1
2
3
4
5
6
7
<audio controls>

<source src="lesson.mp3" type="audio/mpeg">

Your browser does not support HTML audio.

</audio>
Although modern browsers support HTML audio, fallback content remains useful for legacy environments.
Real-World Applications
Professional websites use <audio> for:
- Podcast platforms
- Online radio
- Educational websites
- Meditation applications
- Music streaming services
- Language pronunciation guides
- Sound notifications
Pro Tip
Always provide more than one audio format whenever practical.
Doing so increases compatibility across browsers and operating systems.
Common Mistakes
Mistake 1
Providing only one uncommon audio format.
Mistake 2
Omitting fallback text.
Mistake 3
Using extremely large audio files without compression.
Mistake 4
Hosting copyrighted audio without permission.
Accessibility Note
Audio content should not be the only way users receive important information.
Whenever possible, provide:
- A transcript
- Captions (for accompanying video)
- Downloadable text
- Alternative explanations
This improves accessibility for users with hearing impairments and benefits search engines.
SEO Note
Search engines cannot fully understand spoken audio.
Improve discoverability by providing:
- Transcripts
- Descriptive headings
- Structured content
- Relevant surrounding text
Summary
In this section, you learned:
- Purpose of the
<audio>element. - HTML Living Standard definition.
- Browser support.
- Audio formats.
<source>integration.- Browser selection process.
- Accessibility considerations.
- SEO fundamentals.
Coming Up Next — Section 6.1.2
The next section covers:
- Every
<audio>attribute controlsautoplayloopmutedpreload- Browser behavior
- DOM interface (
HTMLAudioElement) - JavaScript control
- Professional implementation techniques
6.1.2 The <audio> Element Attributes
The <audio> element provides several attributes that control how audio files are loaded, played, repeated, and presented to users.
Some attributes affect the browser’s user interface, while others influence performance and user experience.
Understanding these attributes helps developers build professional multimedia applications.
Complete Attribute Overview
| Attribute | Purpose |
|---|---|
src | Specifies the audio file location |
controls | Displays built-in audio controls |
autoplay | Starts playback automatically |
loop | Repeats playback continuously |
muted | Starts playback with the sound muted |
preload | Provides hints about preloading |
crossorigin | Controls cross-origin requests |
The src Attribute
The src attribute specifies the location of the audio resource.
Example:
1
2
3
4
<audio
src="music.mp3"
controls>
</audio>
Although valid, using <source> elements is generally recommended because they allow multiple formats.
Using <source> Instead of src
Recommended approach:
1
2
3
4
5
6
7
<audio controls>

    <source src="music.ogg" type="audio/ogg">

    <source src="music.mp3" type="audio/mpeg">

</audio>
The browser selects the first supported format.
The controls Attribute
The controls attribute tells the browser to display its built-in audio player.
Example:
1
2
3
4
5
<audio controls>

    <source src="lesson.mp3" type="audio/mpeg">

</audio>
Typical controls include:
- Play
- Pause
- Progress bar
- Volume
- Playback duration
- Seek control
The appearance varies between browsers and operating systems.
The autoplay Attribute
The autoplay attribute instructs the browser to begin playback automatically.
Example:
1
2
3
4
5
<audio autoplay>

    <source src="welcome.mp3" type="audio/mpeg">

</audio>
However, modern browsers usually block automatic playback with sound to improve user experience.
Browser Autoplay Policies
Most browsers now require one of the following before playing audio automatically:
- The user has interacted with the page.
- The audio starts muted.
- The website has previously received permission.
Because of these restrictions, developers should avoid relying on autoplay.
The loop Attribute
The loop attribute repeats the audio indefinitely.
Example:
1
2
3
4
5
<audio controls loop>

    <source src="background-music.mp3" type="audio/mpeg">

</audio>
Common uses include:
- Background ambience
- Meditation music
- Nature sounds
- Sound effects
The muted Attribute
The muted attribute starts playback without sound.
Example:
1
2
3
4
5
<audio controls muted>

    <source src="sample.mp3" type="audio/mpeg">

</audio>
Users can later increase the volume manually if appropriate.
The preload Attribute
The preload attribute gives the browser guidance about downloading audio data.
Possible values:
| Value | Description |
|---|---|
none | Do not preload audio |
metadata | Load only metadata |
auto | Browser decides how much to preload |
preload="none"
Example:
1
2
3
4
5
<audio controls preload="none">

    <source src="podcast.mp3" type="audio/mpeg">

</audio>
The browser waits until the user starts playback.
Advantages:
- Saves bandwidth.
- Faster page loading.
preload="metadata"
Example:
1
2
3
4
5
<audio controls preload="metadata">

    <source src="podcast.mp3" type="audio/mpeg">

</audio>
Only information such as duration and file details is loaded initially.
This is a good choice for podcast libraries and course websites.
preload="auto"
Example:
1
2
3
4
5
<audio controls preload="auto">

    <source src="lesson.mp3" type="audio/mpeg">

</audio>
The browser may begin downloading part or all of the file before playback starts.
Actual behavior depends on the browser and available network conditions.
The crossorigin Attribute
When audio files are hosted on another domain, the crossorigin attribute controls how the browser handles cross-origin requests.
Example:
1
2
3
4
5
<audio controls crossorigin="anonymous">

    <source src="https://example.com/audio/music.mp3" type="audio/mpeg">

</audio>
Common values include:
| Value | Description |
|---|---|
anonymous | Sends the request without user credentials |
use-credentials | Includes cookies and authentication data |
This attribute is mainly required for advanced scenarios involving external media servers.
Combining Multiple Attributes
Example:
1
2
3
4
5
6
7
8
<audio
controls
loop
preload="metadata">

    <source src="nature.mp3" type="audio/mpeg">

</audio>
The browser displays controls, repeats playback, and loads only metadata until playback begins.
Browser Behavior
When the browser encounters an <audio> element, it generally performs the following steps:
- Parse the HTML document.
- Read the audio attributes.
- Evaluate available
<source>elements. - Select the first supported format.
- Apply preload behavior.
- Wait for user interaction or autoplay conditions.
- Begin playback.
Pro Tip
For educational websites, podcasts, and documentation sites, preload="metadata" usually offers the best balance between performance and usability.
Common Mistakes
Mistake 1
Using autoplay for long audio recordings.
Users generally expect to control when audio begins.
Mistake 2
Forgetting the controls attribute.
Without custom JavaScript controls, users may have no way to play the audio.
Mistake 3
Using only one audio format.
Providing multiple formats improves compatibility.
Mistake 4
Using preload="auto" for many audio files on the same page.
This may consume unnecessary bandwidth.
Accessibility Note
Always ensure users can:
- Start playback.
- Pause playback.
- Adjust volume.
- Identify the purpose of the audio.
If the recording contains important information, provide a written transcript.
SEO Note
Although search engines cannot fully interpret audio content, surrounding text, transcripts, headings, and descriptive metadata help improve discoverability.
Summary
In this section, you learned:
- Every important
<audio>attribute. - Browser autoplay behavior.
- Preload strategies.
- Cross-origin media loading.
- Professional implementation techniques.
Coming Up Next — Section 6.1.3
The next section will cover:
- The
HTMLAudioElementDOM interface - JavaScript audio control
- Audio events
- Dynamic playback
- Volume control
- Seeking
- Browser media APIs
- Professional coding examples
6.1.3 The HTMLAudioElement Interface, JavaScript Control, Media Events, and Dynamic Playback
The <audio> element is not limited to HTML markup. Through JavaScript, developers can fully control audio playback, monitor its status, adjust volume, seek to different positions, and build custom media players.
The browser represents every <audio> element as an HTMLAudioElement object.
This object inherits functionality from several DOM interfaces:
- EventTarget
- Node
- Element
- HTMLElement
- HTMLMediaElement
- HTMLAudioElement
Because HTMLAudioElement inherits from HTMLMediaElement, it shares many properties and methods with the <video> element.
Accessing an Audio Element
The first step is selecting the audio element.
HTML:
1
2
3
4
5
<audio id="lessonAudio" controls>

    <source src="lesson.mp3" type="audio/mpeg">

</audio>
JavaScript:
1
const audio = document.getElementById("lessonAudio");
The audio variable now references the HTMLAudioElement.
Playing Audio
JavaScript can start playback.
1
audio.play();
Modern browsers return a Promise.
Example:
1
2
3
4
5
6
7
audio.play()
    .then(() => {
        console.log("Playback started.");
    })
    .catch(error => {
        console.log("Playback prevented:", error);
    });
This is useful because autoplay restrictions may prevent playback.
Pausing Audio
Playback can be paused at any time.
1
audio.pause();
The current playback position is preserved.
Restarting Playback
To restart from the beginning:
1
2
audio.currentTime = 0;
audio.play();
Stopping Audio
HTML does not include a dedicated stop() method.
Instead:
1
2
audio.pause();
audio.currentTime = 0;
This effectively stops playback.
Adjusting Volume
The volume property accepts values between:
0(silent)1(maximum)
Example:
1
audio.volume = 0.5;
This sets playback to 50% volume.
Muting Audio
1
audio.muted = true;
To restore sound:
1
audio.muted = false;
Checking Playback Status
Determine whether audio is currently paused.
1
console.log(audio.paused);
Possible values:
truefalse
Checking Playback Progress
The currentTime property reports the current playback position.
1
console.log(audio.currentTime);
The value is measured in seconds.
Seeking to a New Position
Move to one minute into the recording.
1
audio.currentTime = 60;
This allows custom seek controls.
Audio Duration
Determine the total duration.
1
console.log(audio.duration);
The value is also measured in seconds.
Example:
1
245.6
means the recording lasts approximately four minutes.
Playback Speed
The playback speed can be changed.
1
audio.playbackRate = 1.5;
Common values:
| Value | Speed |
|---|---|
| 0.5 | Half speed |
| 1 | Normal speed |
| 1.25 | Slightly faster |
| 1.5 | Fast |
| 2 | Double speed |
This is especially useful for educational content and podcasts.
Looping with JavaScript
Instead of using the HTML attribute:
1
<audio loop>
JavaScript can enable looping dynamically.
1
audio.loop = true;
Monitoring Audio Events
The browser generates events during playback.
These events allow JavaScript to react to user actions and media changes.
The play Event
1
2
3
4
5
audio.addEventListener("play", () => {

    console.log("Playback started.");

});
Triggered whenever playback begins.
The pause Event
1
2
3
4
5
audio.addEventListener("pause", () => {

    console.log("Playback paused.");

});
The ended Event
1
2
3
4
5
audio.addEventListener("ended", () => {

    console.log("Playback completed.");

});
Useful for:
- Automatic playlists
- Lessons
- Podcasts
- Audio books
The timeupdate Event
This event occurs repeatedly during playback.
1
2
3
4
5
audio.addEventListener("timeupdate", () => {

    console.log(audio.currentTime);

});
It is commonly used to update custom progress bars.
The loadedmetadata Event
1
2
3
4
5
audio.addEventListener("loadedmetadata", () => {

    console.log(audio.duration);

});
Triggered after the browser reads metadata.
The error Event
1
2
3
4
5
audio.addEventListener("error", () => {

    console.log("Unable to load audio.");

});
Useful for handling missing or damaged media files.
Creating Audio with JavaScript
Audio objects can also be created without HTML.
1
2
3
const audio = new Audio("lesson.mp3");

audio.play();
This technique is useful for:
- Notification sounds
- Game effects
- Interactive applications
Professional Example
1
2
3
4
5
6
7
8
9
10
11
const lesson = document.getElementById("lessonAudio");

lesson.volume = 0.8;

lesson.play();

lesson.addEventListener("ended", () => {

    alert("Lesson completed.");

});
This demonstrates several commonly used APIs together.
Browser Compatibility
The HTMLAudioElement interface is fully supported in modern browsers.
| Browser | Support |
|---|---|
| Chrome | Yes |
| Firefox | Yes |
| Edge | Yes |
| Safari | Yes |
| Opera | Yes |
Pro Tip
When creating custom audio players, always provide keyboard-accessible controls and ensure users can pause playback easily.
Common Mistakes
Mistake 1
Calling play() before the user interacts with the page.
Many browsers block this.
Mistake 2
Assuming audio metadata is immediately available.
Wait for the loadedmetadata event.
Mistake 3
Setting the volume outside the valid range.
Only values from 0 to 1 are valid.
Mistake 4
Ignoring playback errors.
Always listen for the error event.
Accessibility Note
If you create custom controls with JavaScript instead of using the browser’s default controls:
- Ensure every control is keyboard accessible.
- Provide visible focus indicators.
- Label buttons clearly.
- Support screen readers using appropriate ARIA attributes where necessary.
SEO Note
JavaScript-controlled audio does not directly improve search visibility.
To help search engines understand your content:
- Include transcripts.
- Use descriptive headings.
- Surround audio with relevant text.
- Provide meaningful page metadata.
Summary
In this section, you learned:
- The
HTMLAudioElementinterface. - JavaScript playback control.
- Audio properties.
- Media events.
- Dynamic audio creation.
- Professional implementation techniques.
Coming Up Next — Section 6.1.4
The next section will cover:
- Browser audio rendering pipeline
- Audio buffering
- Network requests
- Caching
- Security considerations
- Performance optimization
- Accessibility best practices
- Jekyll integration
- Production deployment strategies
6.1.4 Browser Audio Rendering Pipeline, Buffering, Network Requests, Caching, Security, Performance, Accessibility, and Jekyll Integration
Understanding how browsers process audio helps developers create faster, more reliable multimedia applications.
When a browser encounters an <audio> element, it performs several internal operations before any sound reaches the user’s speakers.
These operations include:
- HTML parsing
- Resource discovery
- Network requests
- Audio buffering
- Decoding
- Playback
- Event generation
A clear understanding of this pipeline allows developers to troubleshoot problems and optimize performance.
Browser Audio Rendering Pipeline
The browser follows a sequence of operations when processing audio.
1
2
3
4
5
6
7
8
9
10
11
12
13
14
15
16
17
18
19
20
21
22
23
24
25
26
27
28
HTML Parser
      │
      ▼
Create <audio> Element
      │
      ▼
Read Attributes
      │
      ▼
Evaluate <source> Elements
      │
      ▼
Choose Supported Format
      │
      ▼
Check Browser Cache
      │
      ▼
Download Audio
      │
      ▼
Decode Audio Data
      │
      ▼
Buffer Audio
      │
      ▼
Begin Playback
Each stage contributes to smooth and uninterrupted playback.
Step 1 — HTML Parsing
The browser reads the HTML document.
Example:
1
2
3
4
5
<audio controls>

    <source src="lesson.mp3" type="audio/mpeg">

</audio>
The parser creates an HTMLAudioElement inside the Document Object Model (DOM).
Step 2 — Reading Attributes
The browser examines attributes such as:
controlsautoplayloopmutedpreload
These attributes influence later stages of processing.
Step 3 — Evaluating <source> Elements
If multiple sources exist, the browser checks each one.
Example:
1
2
3
4
5
6
7
<audio controls>

    <source src="lesson.ogg" type="audio/ogg">

    <source src="lesson.mp3" type="audio/mpeg">

</audio>
The first compatible format is selected.
Unsupported formats are ignored.
Step 4 — Browser Cache
Before downloading the file, the browser checks its local cache.
If the audio has already been downloaded and is still valid, playback can begin without another network request.
Benefits include:
- Faster playback.
- Reduced bandwidth usage.
- Lower server load.
Step 5 — Network Request
If the file is not cached, the browser sends an HTTP request.
The request includes information such as:
- File URL
- Request headers
- Cache validation
- Referrer information
The web server then returns the requested audio resource.
Step 6 — Audio Decoding
Audio files are stored in compressed formats.
Examples include:
- MP3
- Ogg Vorbis
- AAC
- Opus
The browser decodes these compressed files into raw audio samples that can be played by the operating system’s audio engine.
Step 7 — Buffering
Rather than playing audio immediately after receiving the first bytes, the browser stores a portion of the audio in memory.
This temporary storage is called the buffer.
Buffering helps prevent interruptions caused by slow or unstable network connections.
Why Buffering Is Important
Without buffering:
- Playback may stop frequently.
- Audio may stutter.
- User experience declines.
With sufficient buffering:
- Playback remains smooth.
- Temporary network slowdowns are less noticeable.
Streaming Audio
Streaming allows playback before the complete file has been downloaded.
Typical streaming workflow:
1
2
3
4
5
6
7
8
9
10
11
12
13
Download Small Portion
        │
        ▼
Decode
        │
        ▼
Buffer
        │
        ▼
Play
        │
        ▼
Continue Downloading
This approach enables users to begin listening almost immediately.
Browser Events During Playback
As playback progresses, the browser generates media events.
Common events include:
| Event | Description |
|---|---|
loadstart | Browser begins loading audio |
loadedmetadata | Metadata becomes available |
canplay | Enough data is available to begin playback |
canplaythrough | Browser estimates uninterrupted playback |
play | Playback begins |
pause | Playback pauses |
timeupdate | Playback position changes |
ended | Playback reaches the end |
error | An error occurs |
These events allow JavaScript to respond appropriately.
Browser Memory Management
Browsers automatically release unused audio resources.
However, developers should avoid creating many hidden audio objects that are never removed.
Good resource management improves performance.
Security Considerations
Audio files should always be obtained from trusted sources.
Potential risks include:
- Copyright infringement.
- Broken external resources.
- Privacy concerns.
- Untrusted third-party servers.
When hosting your own content, store audio files on secure HTTPS servers.
Cross-Origin Audio
When audio files are served from another domain, Cross-Origin Resource Sharing (CORS) rules apply.
Example:
1
2
3
4
5
<audio controls crossorigin="anonymous">

    <source src="https://media.example.com/lesson.mp3" type="audio/mpeg">

</audio>
Proper server configuration is required for successful cross-origin access.
Performance Optimization
Professional multimedia websites optimize audio using several techniques.
Compress Audio
Choose efficient codecs such as:
- Opus
- AAC
- MP3
Avoid Excessive File Sizes
Large files increase:
- Download time.
- Mobile data usage.
- Initial page load.
Use Appropriate preload Values
For large audio libraries:
1
preload="metadata"
is often the best choice.
Enable Browser Caching
Configure web servers to cache static audio files whenever possible.
This reduces repeated downloads.
Accessibility Best Practices
Audio content should always be usable by everyone.
Recommendations include:
- Provide transcripts.
- Allow users to pause playback.
- Avoid unexpected autoplay.
- Label custom controls clearly.
- Ensure keyboard accessibility.
For educational websites, transcripts significantly improve usability.
Jekyll Integration
Store audio files in an organized directory.
Example:
1
2
3
4
5
6
7
8
9
10
11
assets/

└── audio/

    ├── lessons/

    ├── podcasts/

    ├── music/

    └── effects/
Example HTML inside a Markdown post:
1
2
3
4
5
6
7
<audio controls preload="metadata">

    <source src="/assets/audio/lessons/html-introduction.mp3" type="audio/mpeg">

    Your browser does not support HTML audio.

</audio>
This structure keeps multimedia assets organized as the project grows.
Pro Tip
For educational blogs and documentation websites, combine every audio recording with:
- A transcript.
- Downloadable notes.
- Supporting diagrams.
- Source code examples.
This improves accessibility, SEO, and the overall learning experience.
Common Mistakes
Mistake 1
Hosting very large audio files without compression.
Mistake 2
Using autoplay for educational content.
Mistake 3
Ignoring browser caching.
Mistake 4
Failing to provide transcripts.
Mistake 5
Loading many large audio files on a single page.
Accessibility Note
Audio should enhance content, not replace it.
Important information should always be available in text form.
This benefits:
- Users with hearing impairments.
- Search engines.
- Users in quiet environments.
- Users who cannot play audio.
SEO Note
Search engines primarily understand text.
To maximize discoverability:
- Write descriptive headings.
- Include complete transcripts.
- Add meaningful metadata.
- Organize content logically.
Summary
In this section, you learned:
- Browser audio processing.
- Audio buffering.
- Network requests.
- Browser caching.
- Streaming concepts.
- Media events.
- Security practices.
- Performance optimization.
- Accessibility.
- Jekyll integration.
Coming Up Next — Section 6.1.5
The final section of the <audio> chapter will cover:
- Production-ready audio player examples.
- Custom audio controls.
- Complete attribute reference table.
- Browser compatibility.
- Interview questions.
- Publishing checklist.
- Professional workflows.
- Final chapter summary.
6.1.5 Production Examples, Custom Audio Players, Browser Compatibility, Interview Questions, Publishing Checklist, and Chapter Summary
This final section brings together everything learned about the <audio> element and demonstrates how it is used in production websites.
Rather than focusing only on syntax, this section shows practical implementation strategies used by educational platforms, podcast websites, online radio stations, and streaming applications.
Production Example 1 — Educational Website
An online learning platform typically embeds lessons using the following structure.
1
2
3
4
5
6
7
<audio controls preload="metadata">

    <source src="/assets/audio/html-introduction.mp3" type="audio/mpeg">

    Your browser does not support HTML audio.

</audio>
Why this is recommended:
- Native browser controls
- Metadata loaded without downloading the complete file
- Simple implementation
- Broad browser compatibility
Production Example 2 — Podcast Episode
1
2
3
4
5
6
7
<audio controls preload="none">

    <source src="/assets/audio/episode-01.mp3" type="audio/mpeg">

    Your browser does not support HTML audio.

</audio>
Using preload="none" is beneficial when a page contains many podcast episodes because it reduces unnecessary network traffic.
Production Example 3 — Background Sound
1
2
3
4
5
6
7
<audio
loop
muted>

    <source src="/assets/audio/rain.mp3" type="audio/mpeg">

</audio>
Background sounds should never begin unexpectedly with full volume. Always allow users to decide whether playback should continue.
Building Custom Audio Controls
Developers sometimes replace the browser’s default controls with custom buttons.
Example HTML:
1
2
3
4
5
6
7
8
9
<button id="playButton">Play</button>

<button id="pauseButton">Pause</button>

<audio id="lessonAudio">

    <source src="/assets/audio/html-basics.mp3" type="audio/mpeg">

</audio>
Example JavaScript:
1
2
3
4
5
6
7
8
9
const audio = document.getElementById("lessonAudio");

document.getElementById("playButton").addEventListener("click", () => {
    audio.play();
});

document.getElementById("pauseButton").addEventListener("click", () => {
    audio.pause();
});
Custom controls allow developers to match the website’s design while still providing full playback functionality.
Browser Compatibility
The <audio> element enjoys excellent support across modern browsers.
| Browser | Support |
|---|---|
| Google Chrome | Yes |
| Mozilla Firefox | Yes |
| Microsoft Edge | Yes |
| Apple Safari | Yes |
| Opera | Yes |
Older browsers that do not support HTML5 audio will display the fallback content placed inside the <audio> element.
Professional Workflow
A recommended workflow for publishing audio:
- Record the original audio.
- Edit background noise.
- Normalize audio levels.
- Export in MP3 format.
- Optionally create an Ogg or Opus version.
- Compress the files.
- Upload to the server.
- Test playback on desktop and mobile devices.
- Add transcripts.
- Validate HTML before publishing.
Accessibility Checklist
Before publishing:
- Provide playback controls.
- Ensure controls are keyboard accessible.
- Include a transcript.
- Avoid unexpected autoplay.
- Clearly identify the audio’s purpose.
SEO Checklist
To improve discoverability:
- Use descriptive filenames.
- Surround the player with meaningful text.
- Include transcripts.
- Organize headings logically.
- Keep multimedia relevant to the article.
Common Mistakes
Mistake 1
Uploading studio-quality WAV files when compressed formats are sufficient.
Mistake 2
Using autoplay with sound.
Mistake 3
Forgetting fallback text.
Mistake 4
Providing no transcript for educational material.
Mistake 5
Embedding multiple large audio files on a single page without considering page performance.
Interview Questions
Question 1
Which HTML element is used to embed audio?
Answer:
<audio>Question 2
Which DOM interface represents the
<audio>element?Answer:
HTMLAudioElementQuestion 3
Why is the
<source>element commonly used inside<audio>?Answer: It allows multiple audio formats so the browser can choose one it supports.
Question 4
What is the purpose of the
controlsattribute?Answer: It displays the browser’s built-in audio controls.
Question 5
What does
preload="metadata"do?Answer: It loads only metadata, such as duration, without downloading the entire file immediately.
Question 6
Why should educational audio include transcripts?
Answer: Transcripts improve accessibility, SEO, and usability for all users.
Chapter Summary
Throughout this chapter, you learned:
- The purpose of the
<audio>element. - Audio formats and browser compatibility.
- Important attributes.
- Browser rendering and buffering.
- JavaScript control using
HTMLAudioElement. - Media events.
- Performance optimization.
- Security considerations.
- Accessibility best practices.
- SEO recommendations.
- Jekyll implementation.
- Professional publishing workflows.
The <audio> element provides a standards-based, accessible, and highly configurable solution for delivering sound on the web without requiring external plug-ins.
End of Chapter 6.1 — The <audio> Element
Status: Complete
Coming Up Next
Chapter 6.2 — The <video> Element
The next chapter will cover:
- HTML Living Standard definition
- Browser rendering pipeline
- Video codecs and formats
- Attributes
- Responsive video
<source>integration<track>integration- JavaScript control
- Streaming concepts
- Performance optimization
- Accessibility
- SEO
- Jekyll implementation
- Professional production workflows